How to Build a Sportster
(from a pile of junk)
Introduction
This series of pages was originally posted in late 2005 and early 2006. This web-site has been through a couple of redesigns since then and was just redesigned again in 2019. I had intended to delete these pages and focus just on the commercial aspects of IronHeadCycle, however, the statistics indicated that these pages were frequently hit on. Apparently then people like these pages and saw some value in them. I decided to keep them. I've made some changes and included some updates. Hope y'all enjoy...
The full sized version of pictures on this website can be viewed by right clicking on the picture and selecting "VIEW IMAGE", then use your browser back button to return to the webpage.
Chapter One
This is the idea, I've been buying/selling/accumulating Sportsters and Sportster parts for 30 years (actually 45 years now) and I pretty much have enough bits and pieces to put an entire bike together out of the junk in my shop. Some of the parts are one step from the trash heap, some of the parts aren't too bad. The idea is to chronicle the assembly of this pile-o-crap on the Internet and to offer up some how-to information on building XLs. The goal is to put together a good looking, solid running, reliable bike. It is not going to be a restoration, because there ain't a motorcycle to begin with to restore. It is more of a "Flight of the Phoenix" type story. The bike will be pretty much stock looking, because stock Sportsters look pretty cool to begin with. The bike will be black. I wasn't too fond of all black bikes until I rebuilt an all black 1980 for a customer, I decided I liked that bike and wanted to build one similar to it.
I suppose this bike will eventually be for sale (since this story was written its been sold), so, if at some point you decide you like the looks of this project and have to have it for yourself, I'll be glad to sell it to you and you can have the build finished to your spec.
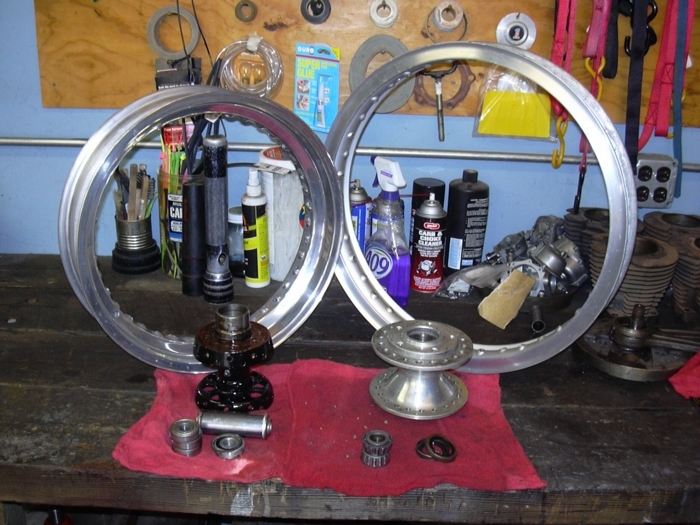
Pile of junk, I mean pile of high quality vintage parts, that has been sitting in the corner of my shop for 10 plus years...
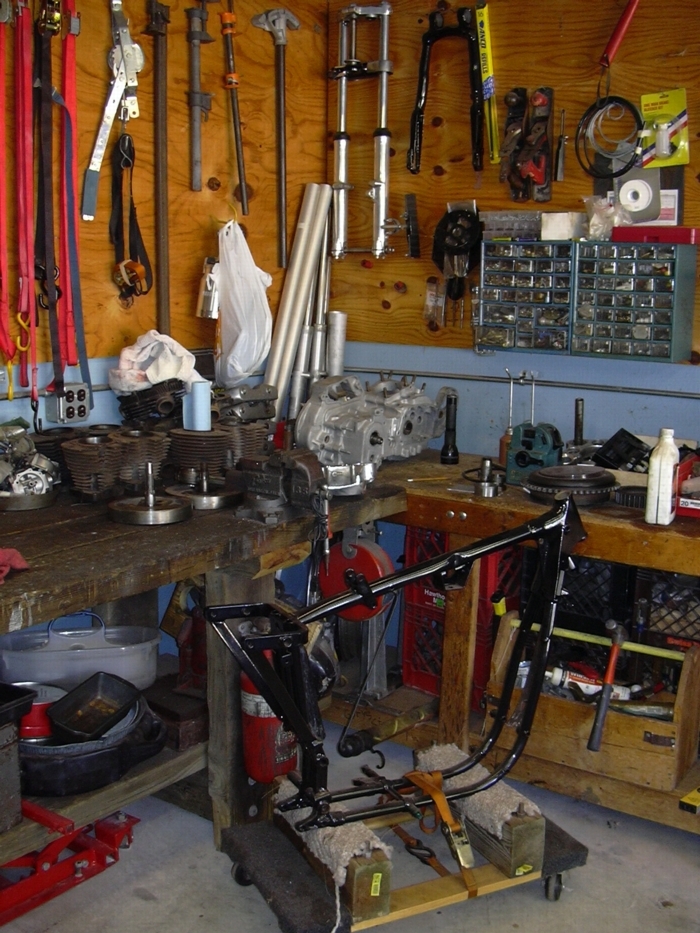
Look closely at the picture. Do you see it? Look closely now. Do you see it yet? Well, you ain't looking hard enough. There is a Sportster there, it ain't put together yet, but it's there. You see the frame in front of the bench, hanging on the wall is a front end. Look on the bench, there is a pile of heads and barrels and a set of crankcases. And some flywheels. Most of a transmission is sitting inside the cases. Under the bench there are a couple of alloy rims and a front hub and a rear hub. There is also a front brake wheel cylinder. I also have the linkage and pedal for the rear brake and a couple of rear brake drums, although I think they are both shot. I also got a pile of old Keihin carbs, maybe enough to make one good one.
So what major stuff ain't in that pile or stashed around my garage and workshop? Well, a set of cams, tappet blocks, push rods and push rod covers. And, a clutch.
Then, of course, there is the stuff that always needs to be replaced; tires, battery, chains, brake shoes etc.
So does the idea of putting this pile-o-crap together make economic sense? Nope, probably not. Old XLs basket cases are worth about $1500 to $2500 these days. A good clean runner might be worth $3500 to $4500. I'm missing just enough major big pieces, clutch and cams, so that there is going to be a fair amount of expense rounding up the essential missing pieces. And the rod bearings, main bearings and crankpin are shot, so there are some fairly extensive rebuild costs. Still, I expect the finished bike to be worth more than I'll have into it.
Why bother? Well 90% of it is there. I've been saving stuff for 30 years and finally have enough to put a bike together out of left overs. On the plus side of this project, the frame is straight, I took it in trade for some work I did a few years back and then I got it powder coated in exchange for some work I did for somebody else. The front end is off of my old 74 XLH, the engine of which now lives in my 85 "Fear No Evo" bike. I rebuilt the front end a few years back, turned the turn signal bosses off and polished the lower legs back then, so the front end is like brand new. So I've got a cherry condition powder coated frame and a cherry condition front end. Plus I've got a 16" Akront polished alloy wheel that an old buddy gave me. The 19" alloy rim I intend to use for the front is anodized not polished, but I think I will be able to get it to take a shine with a little work. So the frame and rolling stock are in excellent shape, all I'll be out cost wise to build the rolling chassis is the cost of stainless steel spokes to lace the wheels up and new bearings for the swing arm. That's not too bad.
As for the engine, it is a pretty sorry piece of crap. It was also taken in trade for work I did. I don't know why I took it for sure. I guess I just liked the idea of having an extra set of cases laying around . Although this reconstruction project officially began Saturday, October 5th, 2005, I began doing some basic work on the engine a few months back. I wanted to see if it was at all salvageable or whether I had just gotten screwed by taking it in trade. The most glaring problem with the engine was the hole that had been gouged into the crankcase by the drive chain and the ensuing shitty weld job somebody had laid on it. Oh yeah, the hole happened to intersect with the internal oil passageway that returns oil to the oil tank. So we have the root cause for the death of this machine, the drive chain cut a hole in the crankcase, either from being extremely out of adjustment or from breaking. The owner, not wanting to spend the money for a good fix, opted for a down and dirty weld job that most likely allowed all the oil to be pumped overboard rather than back into the tank. That would explain the trashed crankpin I found when I split the flywheels. More about the engine when I get to it.
Progress to date, Sunday, November 20, 2005. During the last week I bolted the front end onto the frame. Why start there? Because I had all the parts so it wasn't going to cost anything and it was easy. How's that for picking a starting point? I had a set of neck bearing cups laying around, they may have been out of this frame originally, or they may not have been. I lightly sand blasted the bearing cups and then powder coated them black in keeping with the all black theme. I had a set of neck bearings rolling around that were still good. Like I said the front forks had been rebuilt within the last 4 years, so I hit them with my polishing wheel to touch them up a little and they were ready to go. I greased all the balls up real good so they wouldn't fall out, stuck the lower tree in the neck, installed the top nut, tightened it up, installed the top clamp, the fork tubes and that pretty much did it for the front end.
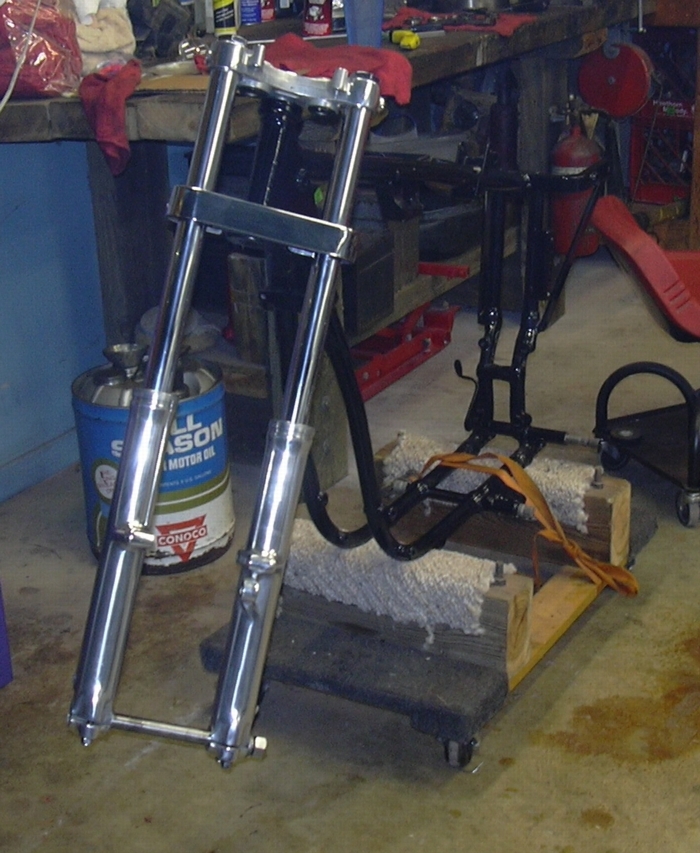
Front end Installed...
Note: this is not a hammer and punch.
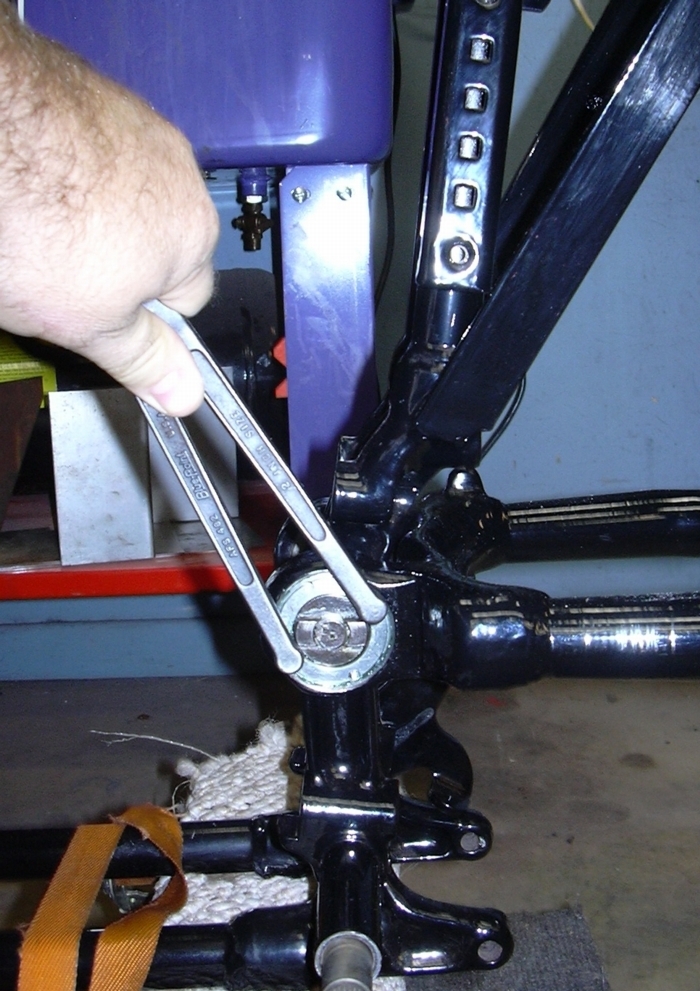
Next up was the swing arm, I had it powder coated back when I had the frame powder coated. (I have the Eastwood do it yourself powder coat setup, it cost 100 bucks and you can't beat it. I use an old electric oven for baking parts, so parts that fit in the oven, I do myself, parts that don't fit in the oven, I send out.) So the swing arm is powder coated and ready to go. The swing arm bearings are all shot, they always are. That is pretty typical of most old XLs, the only way to grease these suckers is to take the swing arm off and manually repack them. A real pain in the ass. The threads on the big nuts that thread into the swing arm that hold the bearing races in are critical. The threads need to be perfect or you will fuck up the threads on the swing arm and render it useless. You should be able to run the big nuts in by hand, if you can't you will need to fix the threads.
Step one in thread repair is to use something very sharp and pointy and drag it around the threads on the swing arm to clean out all the crud stuck deep in the bottom of the threads. If the last thread or so facing out is goobered up you can safely just remove it with a Dremel tool. As far as the nuts are concerned, they can be cleaned up with a thread chaser. A last resort if you can get at least one thread started, is to smear a little valve grinding compound on the threads and start working the nut back and forth. The valve grinding compound will cut the threads and mate the nut to the swing arm. Make sure you clean out all the valve grinding compound when you are done. Remember, if you strip the threads you will ruin the swing arm. And do yourself a favor, spend 8 bucks on an adjustable pin spanner wrench so you don't have to beat the left side nut in with a punch or chisel.
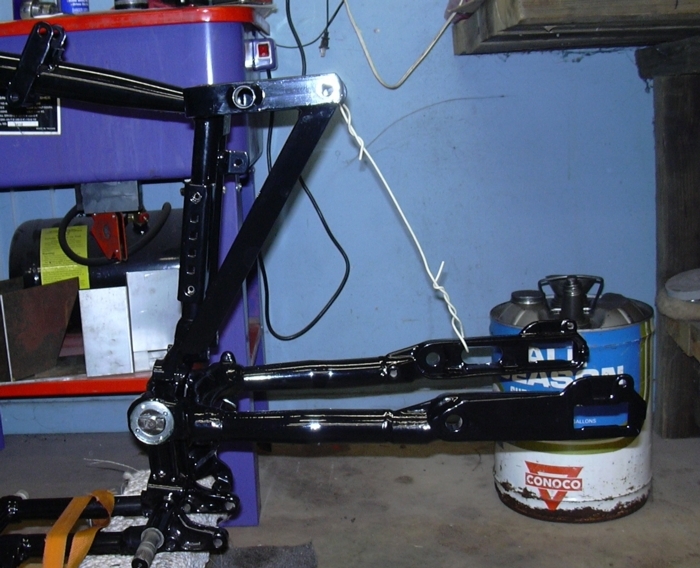
And here is the swing arm installed. I admit, I kind of cheated, I had a powder coated frame and swing arm laying around in my garage for the last two years. That doesn't happen too often. And I had a cherry front end laying around too. But don't worry I have plenty of obstacles coming ahead, stay tuned and you'll get to hear all about them. I've also decided that I should either: A) build the bike or B) do the website, doing both at the same time is a royal pain in the ass. Next posting will be... rear shocks!!! I'm so excited I almost shit.
Swing arm installed...
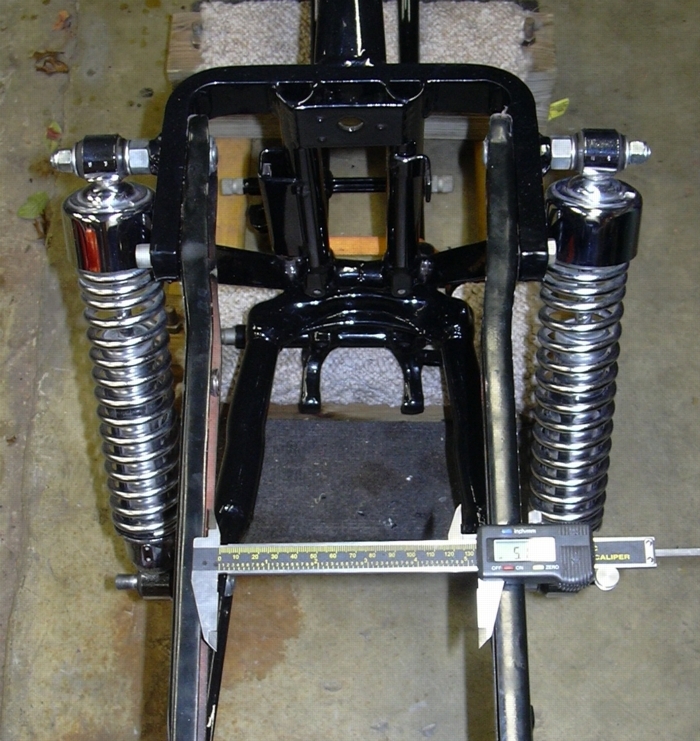
Project to date, Wednesday, November 23, 2005. Box-O-Shocks. Well, it actually isn't a box, it is a plastic crate, and I don't have only shocks in it, it is more like a box of things that are sort of round and long and don't fit in the other plastic crates. Out of three shocks, I figured I'd be able to put two together. As it turns out, one has no oil in it whatsoever making it totally useless, the other two would work but I don't have two springs that would fit. The two chrome springs in the picture are off later shocks and are too small across the inner diameter to fit over the shock body. So it is off to eBay. I should be able to buy a set of late model take offs for 25 bucks. As for those of you who think that is a crappy way out, I'll be glad to install a 400 dollar set of Progressives, just buy them for me. And for those of you who think stock shocks suck, all I can say is that you never drove a rigid frame. I put 20 years in the saddle of a rigid flathead and, after that, any type of springy thing in the back works just fine as far as I am concerned. The old style shocks have 5/8" mounting eyes, the new style shocks have 1/2" mounting eyes. I have a lathe and am planning on turning the mounts down to 1/2" to accommodate the newer style shock. You can buy conversion kits, but I don't want to spend the money on something that I can easily modify. And, bonus part time!!! There was a chain guard in the Box-O-Shocks, it ain't cracked or bent and it will fit right on, all I got to do is strip it and powder coat it.
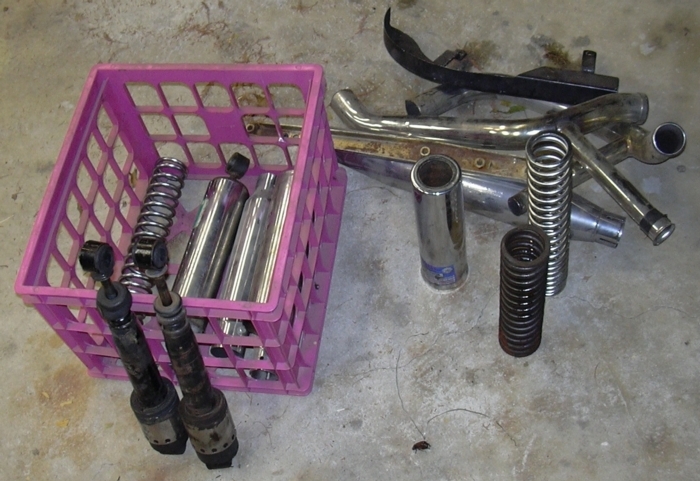
Another crate of junk, I mean high quality vintage parts...
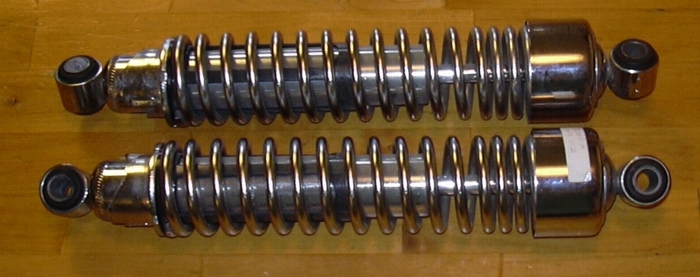
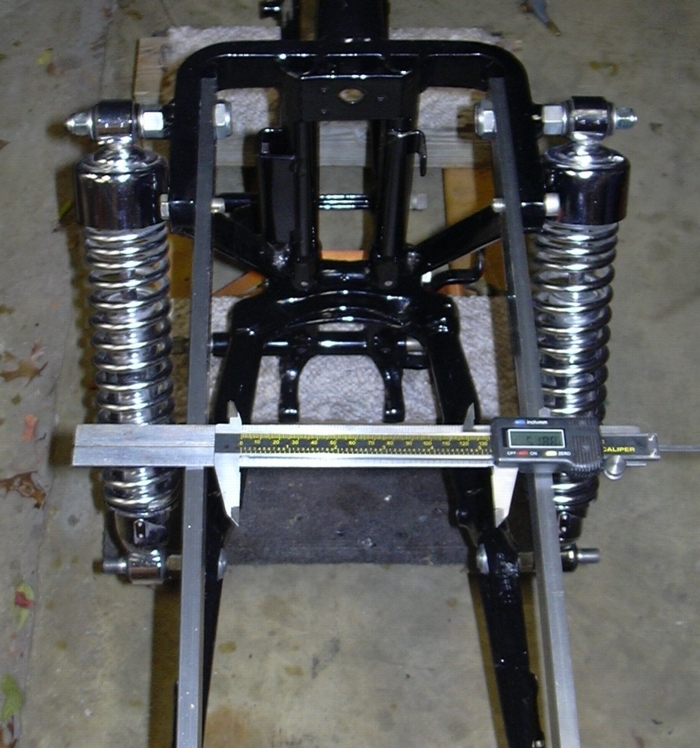
Project to date, Friday, November 25, 2005. My eBay shocks came today and I had the day off. So I decided to machine my shock mounts down from 5/8" to 1/2" to fit the late style eBay shocks and then hang the shocks on the frame. The eBay shocks are supposedly off a 2002 883 and are 13.5" eye-to-eye, just like the original shocks on the 76 frame I am using. Some guys like to lower XLs with shorter shocks, I've found that in a lot of cases the rear tire hits the fender, so I do not usually opt for shorter shocks. Those eBay shocks looked good out of the box, I cleaned them up a little and used them as is. The Smithy is nice to have, but hardly essential for most work, I've probably done 35-40 frame-up rebuilds without it. I bought it by accident on eBay a year ago, I really didn't think I had the winning bid, but, guess what, I did. I wouldn't consider myself a machinist by any means, but I can get a decent finish and good accuracy on most simple jobs.
eBay shocks, stock take-offs are always cheap...
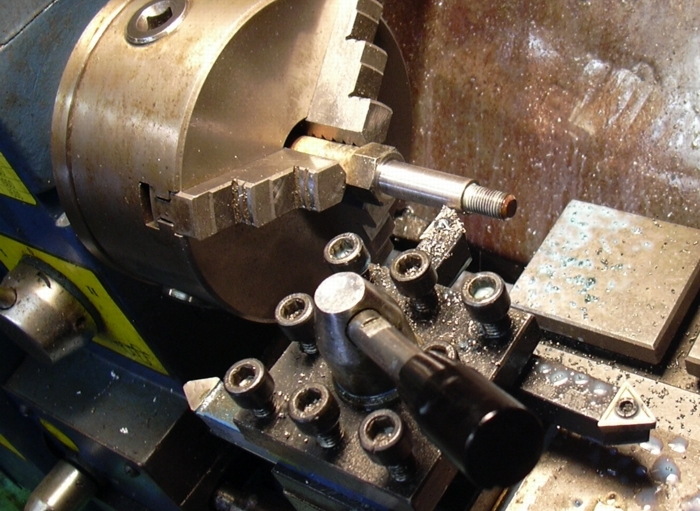
Turning the shock mounts down...

Finished reduced diameter shock mount bolts...
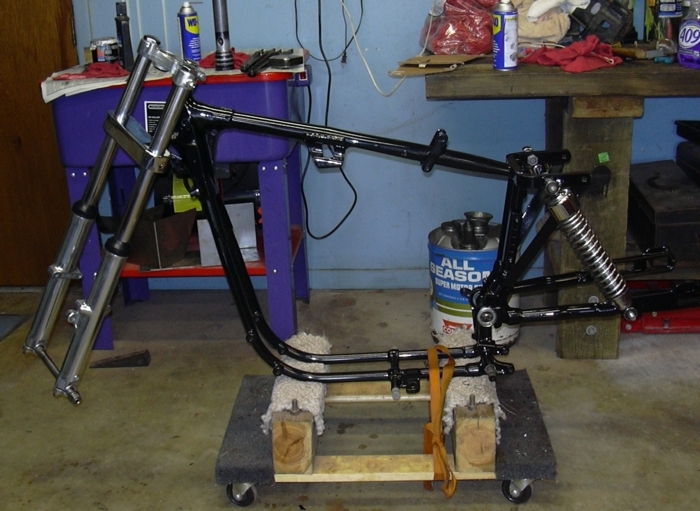
Chassis virtually finished...
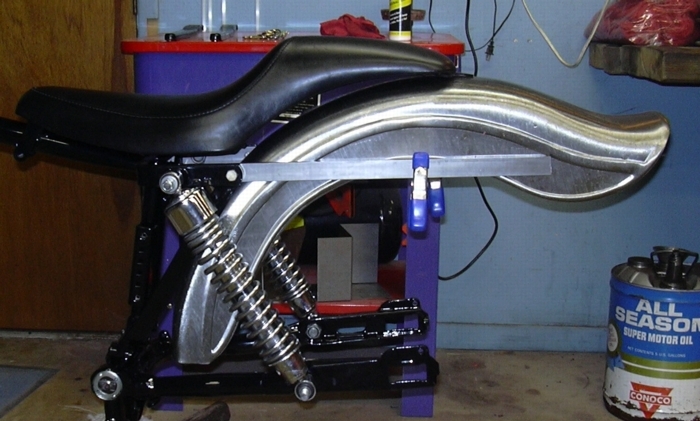
Next up will be the rear fender and wheel, I need to work them at about the same time to make sure they both fit together. The original bike had an 18" X 4.5" tire with a 6.5" fender. I'm planning on using a 16" X 5.1" tire. I know for fact that a 16" X 5.1" tire will rub on a 6" wide fender. I feel some homemade fender struts and a 7" fender coming down the pipe.
Project to date, Saturday, November 26, 2005. I dug the wheel stuff out from under the bench, the rims have been wiped off with a little 409. The 16" Akront rim looks pretty good, I may hit it with some Semi-chrome polish before I put it together. The 19" rim is going to take some sanding and polishing to get it looking good. The front hub polished up pretty good in about 20 minutes on the buff. As it turns out the front hub is a dual disc brake hub, unfortunately, I don't have two calipers or the dual disc fork leg. The rear hub is soaking in a coffee can full of paint stripper, getting it ready for its eventual powder coating. I also found a rear axle, a brake drum that ain't too bad, a front master cylinder that may be salvageable and a little chrome doodad to mount the ignition switch in. And an ignition switch, with the key. A fucking miracle. The rear wheel bearings are good, the front wheel bearings are junk. It sort of sucks having to do the rear wheel now, but the wheel has to be done to make sure the fender will fit right. I probably won't build the front wheel for a while because I really don't need to yet, but I do need to get the rear done.
I find that the original cad plated spokes cannot usually be salvaged, the nipples are usually corroded to the spoke. If you can get them apart they are just plain ugly. I usually cut them in two with a bolt cutter and trash them...

The front hubs usually polish out nicely with a little work...
Project to date, Thursday, December 1, 2005. It is time to start figuring out the rear fender. See the pictures to understand the problem. The caliper is set to the width of a 16" X 5.1" tire. The tire actually comes out to be closer to 5.2", the distance between the fender struts is 6", there is a little bit of a lip on the edge of a stock fender and then you have the heads of the fender bolts protruding toward the tire, and of course all tires are not created equally and some may be a little fatter than others, the bottom line is that a 5.1" tire will rub when stuffed under a not quite 6" wide fender. Some people say the solution is to move the fender struts to the outside of the frame, then you end up with a space that will take an 8.5" fender, in my opinion that is just too damn big for a Sportster and will look stupid. The space between the frame fender strut lugs is 7.75", it just so happens that .375" times 2 equals .750". So if you use hand made fender struts that are made out of .375" cold rolled steel flat you will end up with a space that can be nicely filled with a 7" wide fender. The caliper in both pictures is set to the same dimension, notice the extra room the hand made fender struts have on the picture on the right.
Stock XL fender struts, 6" between them, not a lot of room for a wide tire. Some guys install them outside the frame tabs to make room...
Custom struts made out of flat bar stock make more room for the tire...
This is the fender I have chosen loosely fitted in place, notice the gap between the fender and the seat, notice how the fender hits the diagonal frame brace, notice how the fender looks like it will have to be moved forward, the fender will have to be trimmed in order to make it fit correctly. Notice also how the wheel and tire will have to be in place in order to make sure everything fits nicely. So no holes or cutting will be done to the fender until I have the rear wheel built up. Oh yeah, the seat is a La Pera that came off of one of my old bikes, it is in perfect condition. The fender cost about $75.00. I do have a couple of stock fenders, but opted not to use them because of the clearance problem with the 16" X 5.1" tire.
Test fit of fender, there were a lot of problems with this fender. It is the worst type of import junk; a true piece of crap. I will never buy this type of fender again. Ultimately I decided not to use it. See why in a later chapter...
So speaking of wheel and tires, you've seen the rim and the hub. I've had a set of stainless steel spokes laying around for a year and a half. I bought the wrong size from Buchanan's way back when, and, just yesterday, Kenny Buchanan agreed to exchange them for a set that will fit my spool hub and Akront rim. Way to go Buchanan's. So next up will be powder coating the hub and lacing up the wheel.
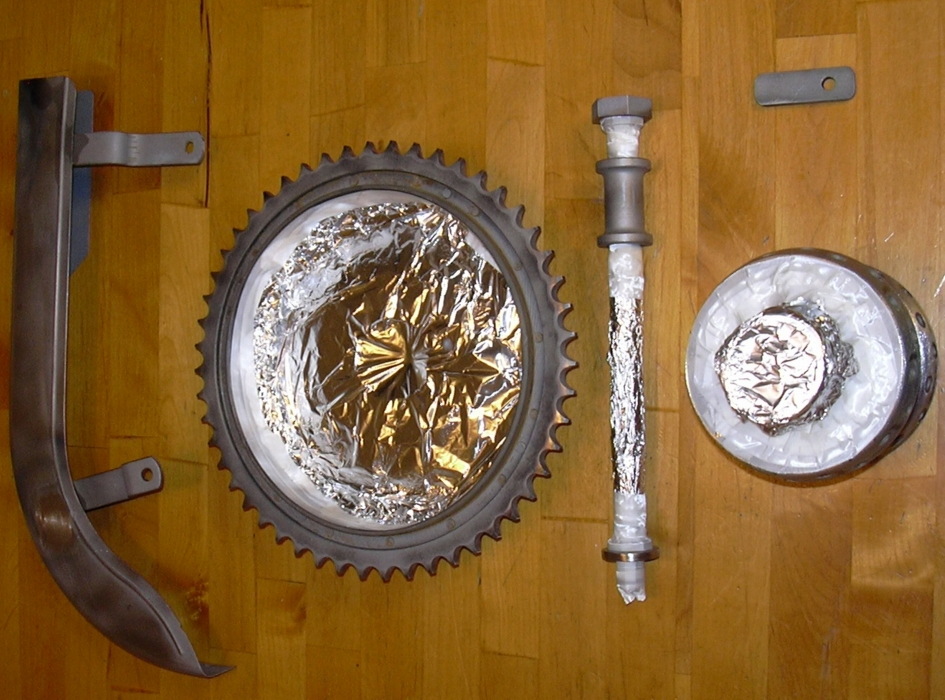
Project to date, Sunday, December 4, 2005. In preparation for the spoke set that should arrive in a week or so it is necessary to get the rear wheel hub ready for lacing, which means finish stripping the paint off it, sandblast it and final cleanup prior to powder-coating. As long as I have to drag out the powder coat stuff, I may as well do a batch of whatever is laying around. So that means hub, rear brake drum, axle, axle spacer, and chain guard. I stripped and sandblasted all that stuff, turns out the chain guard did have a couple small cracks that weren't visible under the layers of old crud. The cracks were easily welded.
A little about powder coating. I bought the $100.00 Eastwood starter setup and it has really performed well. I've used it quite a bit and have learned a few things. Parts have to be absolutely clean, even cleaner than they would need to be for painting. With paint the primer may seal old paint and some dirt beneath the finish coats. With powder coating, the baking temperature will melt old paint and grease out of pores deep within the metal and cause eruptions on the surface of the finished powder coat. I wash everything in a parts washer to get the loose greasy crud off, then wire wheel it to get the loose rust and paint off, then sandblast and sandblast again, then hot water and soap wash, then metal prep and then a final wipe-down with acetone just prior to the first bake. Yep, the first bake. Just in case the part isn't clean enough, I bake it for a while to melt any remaining oil, grease and paint out. I inspect the part while it is hot, if it looks clean, I shoot the powder while it is hot. The powder sticks better to a hot part and begins to melt and flow out before the part is tossed back in the oven. If I can see any grease or paint oozing out of seams or pores on the hot part, it goes back through the cleaning cycle again. A pain in the ass? Yes. Worth it? Most definitely. You get a glossy surface almost impervious to gas and other chemicals and exceedingly resistant to abrasion. I've powder coated foot pegs that barely showed any wear after 6 months, try that with paint.
A word about masking, as you can see from the picture, fiberglass tape and aluminum foil replace masking tape and paper. You may also notice that the flange on the hub is masked in the area where it mates with the brake drum. The brake drum is also masked in the same area. On surfaces where high torque is transmitted, there must be metal-to-metal contact. As tough as powder coat is, it will eventually wear away when subject to constant torque loads. As the powder coating erodes, the bolts holding the drum to the hub would loosen and eventually back off. This same principal applies to crankcase halves, cylinder heads, etc. Parts that transmit torque loads from one to another must be in metal-to-metal contact. I've got a story about an airplane engine crankcase that was destroyed because of silicone sealer, but I'll cover that when I get to the engine.
Before...
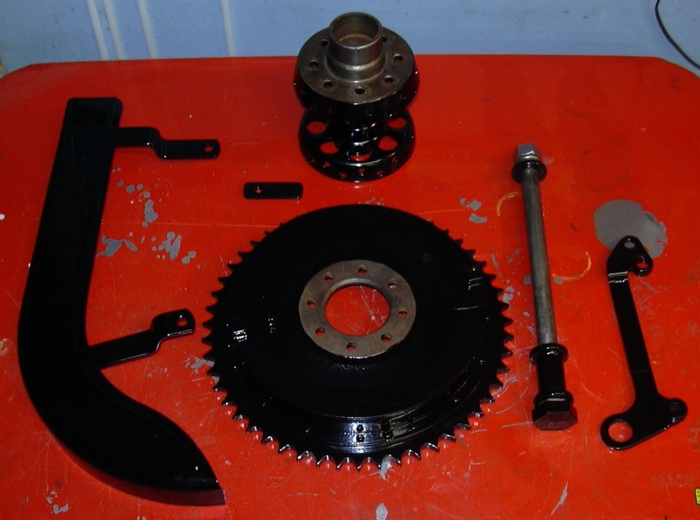
After...
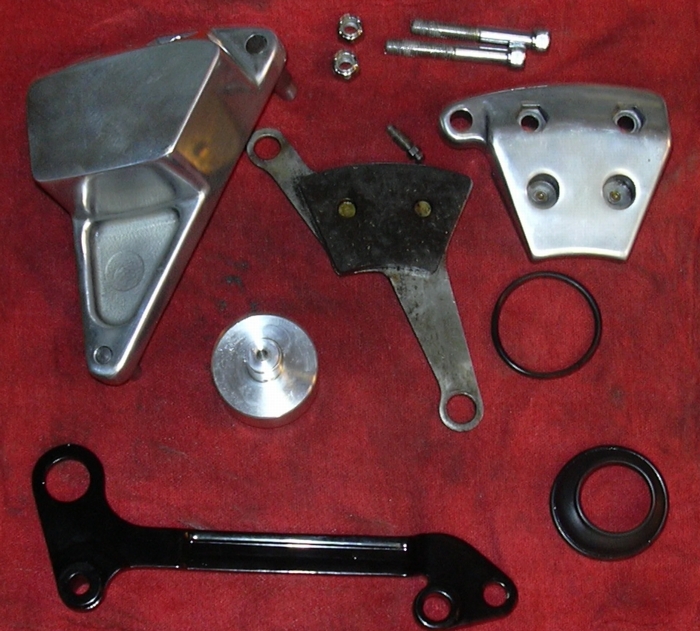
Since a lot of this bike project is about rounding up stuff I have laying around, I spend a lot of time digging through crates of my junk looking for bits and pieces I know I'll eventually need. Sometimes I just amaze myself by how I managed not to fuck something up. Like the front brake wheel cylinder. I knew I had a least two laying around, one I knew was polished and looked great, at least it did three years ago. Would it still be any good? DOT 3 brake fluid absorbs water and will corrode the shit out of aluminum if left long enough. Guess what. I had the foresight to pop the puck out of the wheel cylinder and clean the DOT 3 out before I tossed it into that crate, it was still in perfect shape. I still had the o-ring and dust seal in a sealed baggie. Another fucking miracle, just like finding an ignition lock... with a key it.
Caliper, polished, powder coated, ready to assemble...
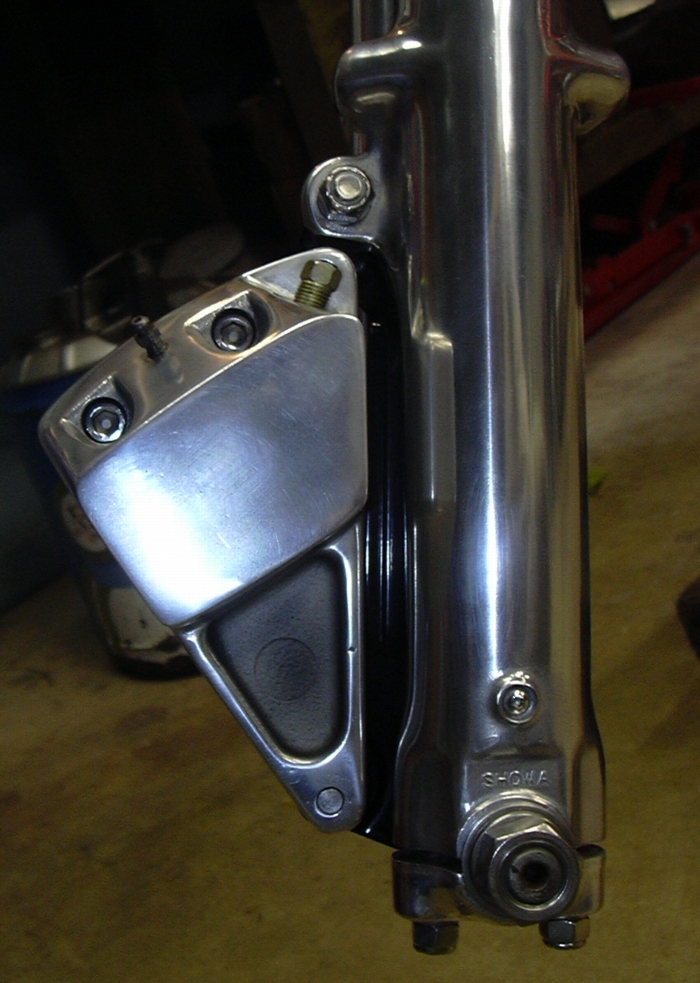
Brake assembled...
That is about it for now, waiting for spokes to show up. And I have a paying job in the garage, rewiring a Honda 125. That pretty much proves I'll do anything for a buck.
I'm using Dreamweaver to build these pages, and Dreamweaver tells me that it is going to take 275 seconds to download this page at 56K, and frankly, I wouldn't wait that long. I'd be out of here. So in an effort to keep the download times a little shorter, here ends Chapter One. The next chapters will be quicker downloading, I promise...